How To Add A Website Speedtest Widget On Your Blog
Keith: for Blogfreakz
Here’s a nice little widget for your blog site that may come
in handy if you or your visitors ever experience slow page loading times. It
could either be due to the user’s Internet speed or the site being accessed itself.
So here’s a way to determine if it’s the site that is slow. It’s a widget from iwebtool.com that measures the amount of
time it takes for your web site to load.
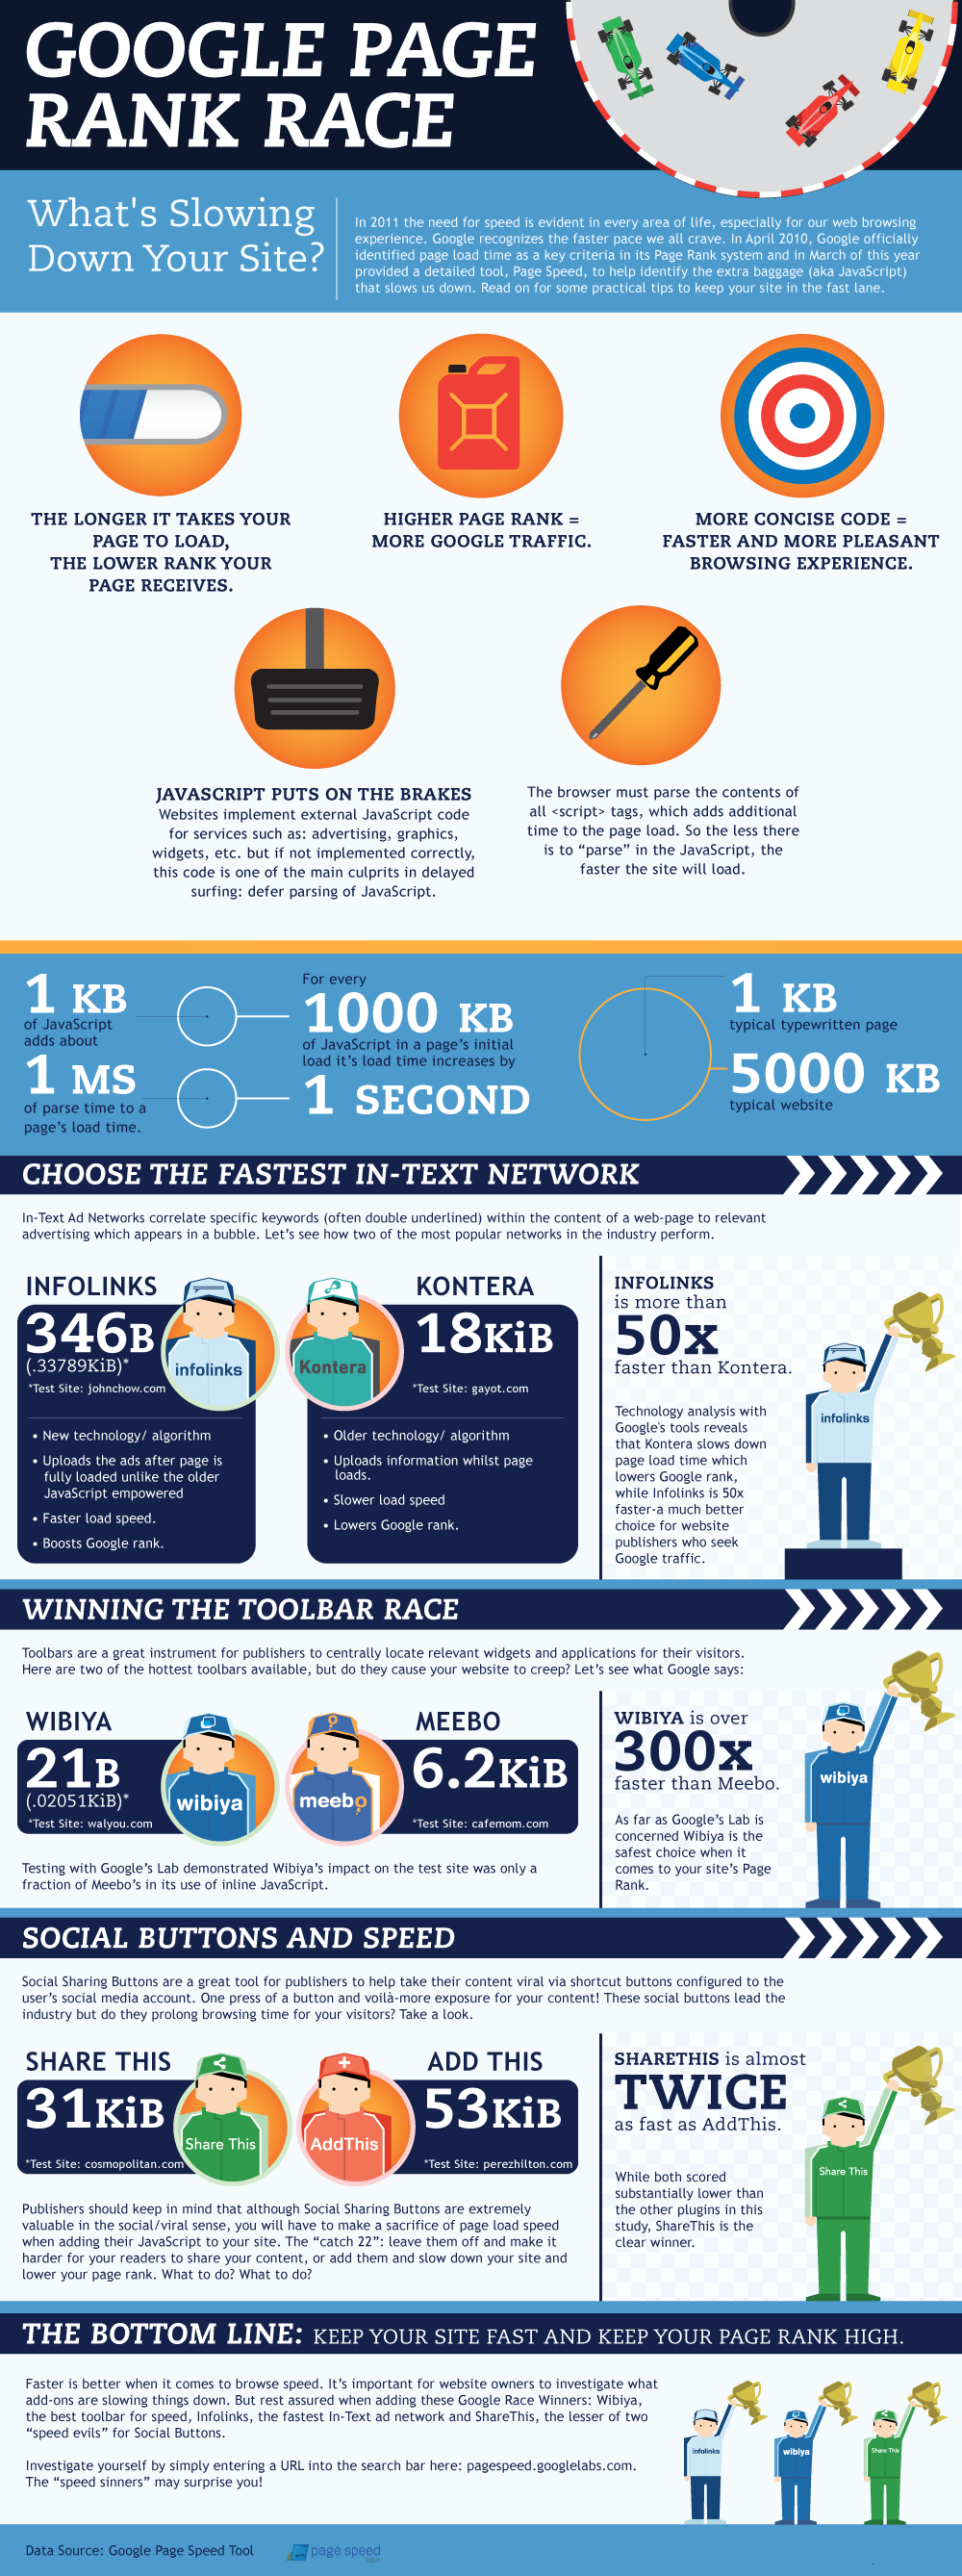
What should it matter why you ought to know if it’s actually your page that is sluggish and not the connection? Because a site that loads up slowly can affect your page rank negatively! (Click here to see an infographic)
There are so many factors that can slow down your site’s performance in terms of speed, and among them are toolbars, In-Text Ads, and Social Buttons that are embedded in a web page.
Here’s how to install this plugin in your web or blog page.
1.
Log in to your Blogger Dashboard.
2.
Click on the Design tab and go to Page Elements.
3.
Click on Add a Gadget (the size of the space for
the gadget at the bottom part of the Simple Design template is just about
right/perfect for this).
4.
Next, choose HTML/JavaScript from the list.
5.
Copy/Paste this code in it.
|
<!-- iWEBTOOL -
www.iwebtool.com - Website Speed Test -->
<form
method="get" name="pageform"
action="http://www.iwebtool.com/tool/tools/speed_test/speed_test.php"
target="pageframe" onsubmit="return validate(this);">
<table border="0"
style="border-collapse: collapse" width="100%">
<tr>
<td height="91"
valign="top">
<table class="tooltop"
style="border-collapse: collapse" width="100%"
height="76">
<tr>
<td>
<table
border="0" style="border-collapse: collapse"
width="100%" cellspacing="5">
<tr>
<td
valign="top" colspan="5">
<b><font size="2">Your
domain(s):</font></b><font size="1">Enter each
address on a new line (Maximum 10)</font>
</td>
</tr>
<tr>
<td
valign="top" colspan="4"><textarea
rows="11" name="domain" style="width:
100%"></textarea></td>
<td> </td>
</tr>
<tr>
<td><input type="submit" value="Check!"
style="float: left"></td>
<td><font
size="1">(eg. iwebtool.com)</font></td>
<td> </td>
<td
colspan="2"> </td>
</tr>
</table>
</td>
</tr>
</table>
</td>
</tr>
<tr>
<td>
<iframe
name="pageframe" width="100%" height="251"
class="toolbot" frameborder="0"></iframe>
</td>
</tr>
<tr>
<td
height="39"> </td>
</tr>
</table>
</form>
<script
language="JavaScript">
function validate(theform) {
if (theform.domain.value == "")
{
alert("No domain
provided");
return false;
}
return true;
}
</script>
<!-- iWEBTOOL -
www.iwebtool.com - Website Speed Test -->
|
6.
Hit “Save” then click on View Blog to see the
result.
And that’s it! It’s quick and easy that I bet it didn’t even
take you more than 5 minutes to accomplish it. Your site should then have
something that looks like this:

Click here for more of the jquery tutorials for beginners
No comments:
Post a Comment